
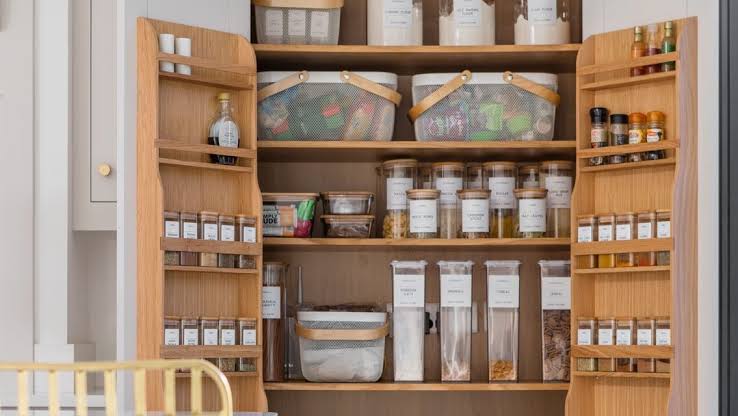
Open almost any pantry door and the same scene appears: half-torn bags of rice, mismatched plastic bins, spices in a dozen shapes and colors, and a general sense that everything is one grocery run away from chaos. It’s not a lack of effort. It’s a lack of system, and often, the wrong tools for the job.
The good news is that an organized pantry doesn’t require a full renovation or a stack of identical plastic tubs. It asks for a thoughtful process, a few natural materials that actually last, and a layout that makes sense for how you cook. This guide walks you through exactly how to organize your kitchen pantry from the ground up, swapping clutter and plastic for calm, considered storage.

Step 1: Decluttering and Auditing Your Food Staples
Before you organize anything, you need to see what you actually have. Most pantry chaos comes from duplicate items, expired goods, and staples bought “just in case” that never get used.
Empty Everything Out
Pull every item off the shelves. Wipe the shelves down while they’re bare, and group items into rough categories as you go: grains, baking, canned goods, spices, snacks, and oils.
Sort with Three Piles
- Keep: Items you use regularly and are within date.
- Donate: Unopened, unexpired items you won’t realistically use.
- Toss: Expired, stale, or unidentifiable items.
Map Your Zones
Before restocking, decide where each category will live. A simple rule of thumb:
- Eye level: Everyday staples you reach for most (grains, oils, seasonings).
- Upper shelves: Bulkier or less-frequent items.
- Lower shelves: Heavy items, bulk buys, and anything for kids to access safely.
This single step, done properly, solves more than half of the “organizing” problem before a single container is purchased.
Step 2: Ditching Toxic Plastics for Natural, Organic Containers
Plastic bins are the default because they’re cheap and easy to find, but they come with real trade-offs. They stain, absorb odors, can leach chemicals when they contact salty or oily ingredients over time, and they rarely look as good after a year as they did on day one.
Natural materials solve this differently. Coconut shell, for instance, is naturally moisture-resistant and antimicrobial, which makes it especially well-suited to something like salt, which clumps and corrodes ordinary containers over time.
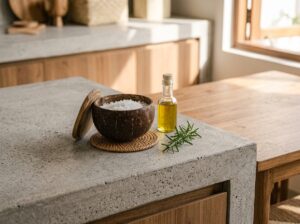
This is where a piece like Rootiya’s handcrafted coconut shell salt container earns its place on the counter rather than tucked away in a cupboard. Each one is shaped from a real coconut shell, so no two are identical, and it comes with a fitted wooden lid to keep moisture out and a built-in spoon slot, so you’re never fishing around with wet fingers. It’s plastic-free, genuinely functional, and it looks like a piece of art beside your stove.
Plastic vs. Coconut Shell Storage: A Quick Comparison
| Feature | Plastic Containers | Coconut Shell Storage |
|---|---|---|
| Moisture resistance | Poor to moderate; can trap condensation | Naturally moisture-resistant |
| Odor & stain absorption | Absorbs oils and odors over time | Resists staining and odor buildup |
| Chemical safety | Risk of leaching with heat, oil, salt | Naturally inert, non-toxic |
| Durability | Cracks, yellows, warps over 1-2 years | Hardens and lasts for years with care |
| Aesthetic | Utilitarian, often mismatched | Warm, artisanal, one-of-a-kind |
| Sustainability | Petroleum-based, low biodegradability | Upcycled agricultural by-product |
For dry staples like rice, flour, and beans, glass or stainless steel are excellent companions to coconut shell, giving you a fully plastic-free lineup without sacrificing visibility or shelf life.
Step 3: Setting Up a “Pinch & Scoop” Countertop Seasoning Station
A well-organized pantry isn’t only about what’s hidden behind a door. The seasonings you use daily deserve a spot within arm’s reach of the stove, styled simply enough that it becomes part of your kitchen’s character rather than clutter.
How to Build the Station
- Choose your core seasonings. Salt, pepper, and one or two everyday spice blends are usually enough. A crowded station defeats the purpose.
- Anchor it with your salt container. A coconut shell salt container is the natural centerpiece here, its rounded shape and wooden lid warming up the surrounding surfaces, with the spoon slot keeping a small scoop always on hand.
- Add a small wooden tray or board underneath to contain drips and visually ground the grouping.
- Keep it to a “pinch and scoop” motion. Everything should be reachable and usable in one hand, mid-recipe, with no lids to hunt for and no plastic clasps to fight.
Natural Styling Tips
- Cluster items in odd numbers (three is the sweet spot) for a balanced, unforced look.
- Let materials repeat: wood, shell, and linen read as a cohesive set even without matching brands.
- Resist the urge to decant everything. One or two beautiful containers on display, with the rest stored out of sight, reads calmer than a full row of jars.
Step 4: Using Glass Decanting and Natural Textures
Once your seasoning station is in place, extend the same principle to your shelves.
Why Glass Works So Well
Glass jars let you see what you have and what’s running low at a glance, which naturally reduces both over-buying and food waste. They’re non-porous, so they won’t absorb odors from dried herbs or spices, and they can go from pantry shelf to countertop without looking out of place.
Layer in Natural Textures
- Line baskets or shelves with linen or cotton liners instead of plastic mats.
- Use small wooden trays to group similar items, like baking staples or breakfast items.
- Bring the same material story to your dining table by finishing the look with eco-friendly cane coasters under water glasses and mugs, protecting countertops and surfaces while tying the pantry’s natural palette into the rest of the kitchen.
The goal isn’t visual perfection. It’s consistency, a handful of repeated materials that make the whole space feel intentional rather than assembled from whatever was on sale.
Step 5: A Maintenance Routine to Keep It Organized
An organized pantry doesn’t stay that way by accident. A light, regular routine keeps it from sliding back into clutter.
- Weekly: Quick scan for anything expired, spilled, or out of place. Wipe down the seasoning station.
- Monthly: Check stock levels and top up decanted staples before you run out, not after.
- Seasonally: Do a fuller audit, similar to Step 1, especially before big grocery shops around holidays.
- As needed: Wipe wooden and coconut shell items dry after use, and avoid letting them sit in standing water, to keep them looking and performing their best for years.
A five-minute weekly check is far easier than another full overhaul six months from now.
Frequently Asked Questions
What is the best way to organize a small pantry with limited shelf space?
Prioritize vertical space with stackable glass jars, use the inside of the door for spices or small items, and keep only your most-used staples decanted; everything else can stay in its original packaging, sorted into labeled baskets, on higher or harder-to-reach shelves.
How do I keep salt from clumping in my pantry?
Clumping usually comes from humidity and airtight seals that trap condensation. A container designed for airflow and moisture resistance, such as a coconut shell salt container with a wooden lid, helps far more than a sealed plastic tub, since the shell naturally regulates moisture better than plastic does.
How often should I reorganize my pantry?
A light tidy weekly and a fuller audit every three to four months is generally enough for most households. The bigger factor is having a system, clear zones, consistent containers, so daily use doesn’t undo your work between audits.
Bring Natural Order to Your Pantry
An organized pantry isn’t about matching bins or Pinterest-perfect rows. It’s about a system that fits how you actually cook, built with materials that are kind to your food and to the planet. Start with a proper audit, swap out the plastics that don’t deserve a place in your kitchen, and let a few well-made, natural pieces do the rest of the work.
Ready to bring this into your own kitchen? Shop the full collection, including the handcrafted coconut shell salt container and eco-friendly cane coasters, at Rootiya.com, with free worldwide shipping on every order.